*** This is the Active Directory Database we’re talking about here, so make sure you have a good backup of the server, in case this doesn’t work***
This Stop code is only seen on a system with Active Directory on it. You notice it when the server is booting. You’ll get a blue screen and an error code, like the following:
STOP: c00002e2 Directory Services could not start because of the following error:
A device attached to the system is not functioning.
Error Status: 0xc0000001.
Please shutdown this system and reboot into Directory Services Restore Mode, check the event log for more detailed information.

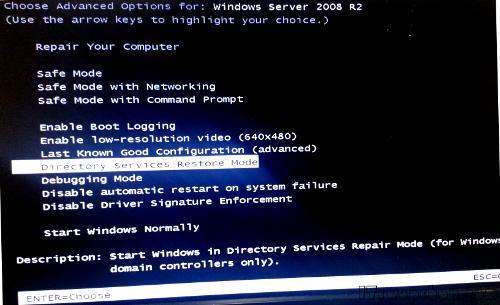
To begin, do as the message says, and boot into Directory Services Restore Mode. When the server powers on, press F8 before the OS begins to load. You should see a selection screen like this. Choose Directory Services Restore Mode:
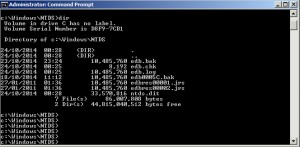
Once in Directory Services Restore Mode, you can check if there is a problem with the database by running the following commands:
ntdsutil.exe
activate instance ntds
files
If there is a problem with it, you’ll see something like this returned:
Could not initialize the Jet engine: Jet Error -501. Failed to open DIT for AD DS/LDS instance NTDS. Error -2147418113
To fix, just rename all of the .log files located in C:\windows\ntds to .log.old, or anything else, so they can be recreated.
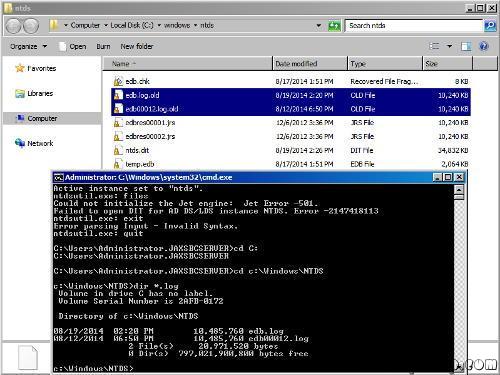
Now reboot the server. For most people, this fixed the database, and the server booted up. For others, it still blue screened after this. If you continue to get a blue screen, run the following command in Directory Services Restore Mode, and then reboot:
esentutl /p “c:\windows\ntds\ntds.dit”
—– Same instruction above in details —
STOP: c00002e2 Directory Services could not start because of the following error: A device attached to the system is not functioning.
Error Status: 0xc0000001. Please shutdown this system and reboot into Directory Services Restore Mode, check the event log for more detailed information.
- Restart the server and press F8 key, select Directory Services restore mode.
- Log in with the local administrator username and password
- Type: cd \windows\system32
- Type: NTDSUTIL
- Type: activate instance NTDS
- Type: files
- If you encounter an error stating that the Jet engine could not be initialized exit out of ntdsutil.
- Type: cd\
- Type: md backupad
- Type: cd \windows\ntds
- Type: copy ntds.dit c:\backupad
- Type: cd \windows\system32
- Type: esentutl /g c:\windows\ntds\ntds.dit
- This will perform an integrity check, (the results indicate that the jet database is corrupt)
- Type: esentutl /p c:\windows\ntds\ntds.dit
- Agree with the prompt
- Type: cd \windows\ntds
- Type: move *.log c:\backupad (or just delete the log files)
This should complete the repair. To verify that the repair has worked successfully:
- Type: cd \windows\system32
- Type: ntdsutil
- Type: activate instance ntds
- Type: files (you should no longer get an error when you do this)
- Type: info (file info should now appear correctly)
I then rebooted and windows started normally.
После этого у меня заработало!!! :)
Некоторые полезные статьи:
1. Переименование контроллера домена ТУТ и ТУТ
2. Перенос настроек DHCP (мне помогло следующее - нашел в инете):
У меня в своё время тоже не получилось перенести DHCP-сервер при помощи команды netsh с ключами import и export. Похоже они действуют только в пределах одной версии Windows Server. Зато помогла команда netsh dhcp server [IPAddress] dump > dhcp.conf
В полученном текстовом файле (dhcp.conf) остается только заменить адрес старого DHCP-сервера на новый (менял везде где он встречается), а затем дать команду (на новом сервере) netsh < dhcp.conf
меня в своё время тоже не получилось перенести DHCP-сервер при помощи команды netsh с ключами import и export. Похоже они действуют только в пределах одной версии Windows Server. Зато помогла команда
netsh dhcp server [IPAddress] dump > dhcp.conf
В полученном текстовом файле (dhcp.conf) остается только заменить адрес старого DHCP-сервера на новый, а затем дать команду (на новом сервере)
netsh < dhcp.conf